How to Implement Biometric Functionality in any Web Application
Biometric identification technology has evolved significantly over the years. Initially, biometric identification was used primarily for large-scale government projects such as national ID cards, passports, law enforcement and other eGovernance solutions. The technology was complex and expensive, making it inaccessible to the average business organization. However, as the demand for more secure forms of identification grew, the technology became more accessible and affordable.
Today, biometric identification is used in many applications, including border control, banking, healthcare, and even most enterprises use biometric identification to manage their workforce. The technology has become much more user-friendly, with many biometric identification systems relying on the iris, facial recognition, and fingerprint scanning. Biometric identification is now more accessible to developers, with many biometric APIs available for integration into a wide range of applications. As a result, the use of biometric identification is becoming increasingly widespread. It is expected to continue to grow in the coming years. This blog will give a step-by-step process to add biometric functionality to any web application.
Biometric Capture Tool & Matching Engine
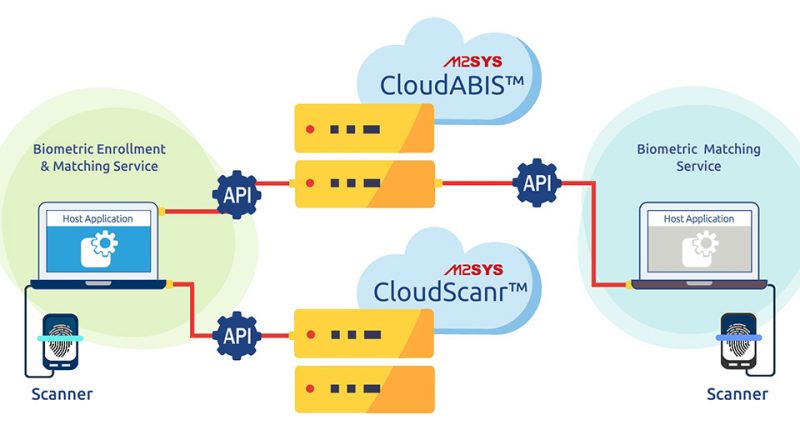
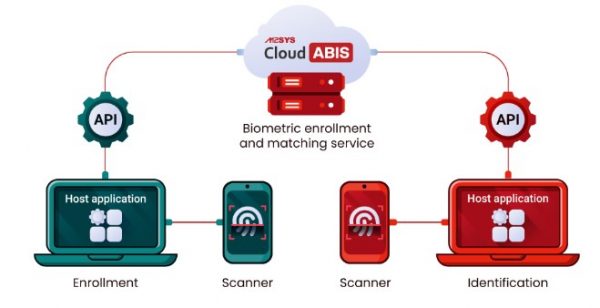
Integrating biometric functionality into a web application requires a biometric device, a biometric capture tool, and a biometric matching engine. In this context, CloudScanr will serve as the biometric capture tool, CloudABIS as the biometric matching engine, and the Prison secure application from M2SYS eGov will be used to demonstrate the integration process. In order to proceed with the setup, it is important to gain a fundamental understanding of both the biometric capture tool and the matching engine.
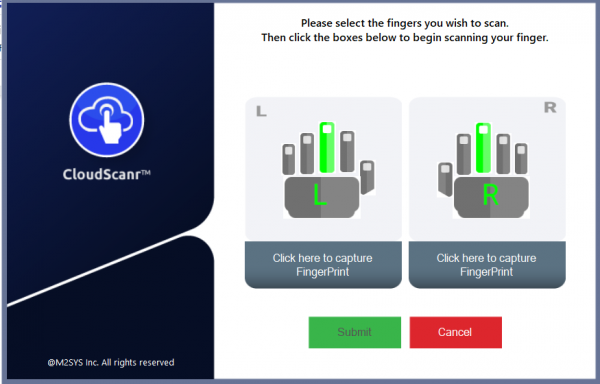
Biometric Capture Tool: You can use any biometric device to capture your biometric data. Once the capture tool completes biometric data capturing, the capture tool will initiate the API call and send the capture data to the biometric matching servers along with the required parameters. M2SYS CloudScanr is a dynamic capture tool that simplifies the process of integrating biometric hardware into web applications, eliminating the need for developers to worry about ActiveX, native code integration, or browser plug-ins. CloudScanr utilizes a web-based API that allows you to integrate capturing from various biometric devices into any windows or web-based application. It automates the ability to capture various kinds of biometric templates and image formats into a very simple-to-use framework. With CloudScanr, the most popular biometric devices can be easily integrated, providing a seamless “plug and play” experience for the user.
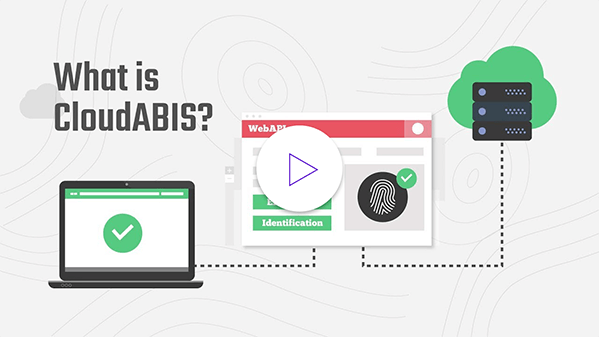
Biometric Matching Engine: A biometric matching engine is a crucial software component that compares and matches biometric data with already enrolled templates stored in the database. The matching engine’s main objective is to compare an individual’s identity by determining if the biometric data collected from them matches the already enrolled template stored in the database. CloudABIS is a robust and scalable biometric identification system offered as a service (BaaS) that eliminates the challenges and expenses associated with constructing and maintaining a reliable biometric identification system. It supports multimodal matching with a single API call and all the user data is completely secure against various cyberattacks.
To configure CloudABIS biometric API with your web application, please follow these straightforward steps:
Setting Up CloudABIS Account
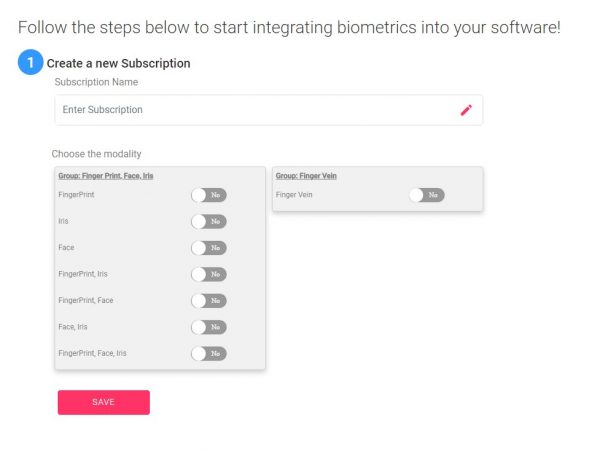
To start, the user must first create an account on the CloudABIS portal. Once the registration process is complete, the user will be directed to a page where they must select the preferred biometric modality for their project. It is then necessary to name the project and save it for future reference.
Collect the Biometric Credential
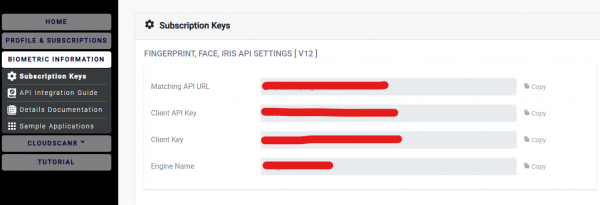
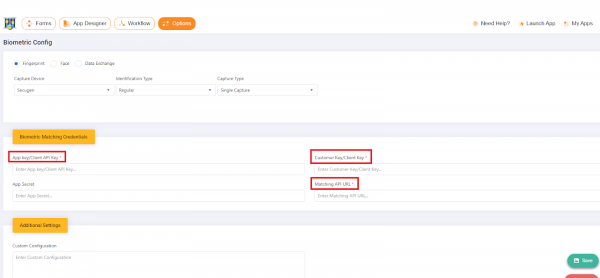
Once an account is created, users will be given a 14-day trial period to test the software and determine whether they want to subscribe to CloudABIS based on their project or business needs. To configure the application, users must first obtain their biometric credentials, including the Matching API URL, Client API KEY, and the Client KEY. These credentials can be obtained by clicking on the ‘Biometric Information’ tab and selecting ‘Subscription Keys’.
Download CloudScanr Capture Tool
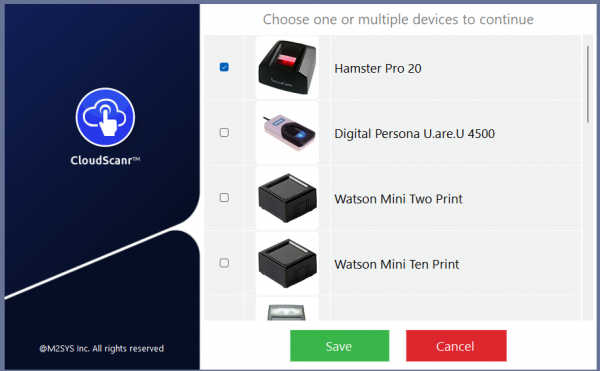
Users can seamlessly integrate any biometric device with their Windows PC by downloading CloudScanr from the CloudABIS portal and installing it. Once CloudScanr is installed, users can easily connect their desired biometric device to their PC, select the device from CloudScanr, and save it. CloudScanr will take care of the rest by automatically installing the necessary driver and integrating the device for immediate use.
Configure the Application with Biometric Credential
To configure and test the biometric credentials, we will utilize the M2SYS prison secure application. The first step is to download the application from the M2SYS eGov Marketplace. Once downloaded, users should click on the application icon and select “Edit Design” by clicking on the three dots.
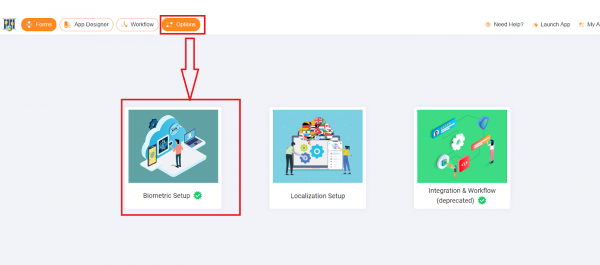
Once the “Edit Design” button is clicked, the Application Designer will open up. Users should then navigate to the “Options” tab and select “Biometric Setup” to proceed.
At the Biometric Setup menu, users are required to select the specified device or modality they will be using, and configure the biometrics from this section. To do so, users need to copy and paste the biometric matching credential obtained from the CloudABIS portal. Once the credentials have been inputted, users should click the “Save” button to complete the setup process.
After inputting the credentials, click save.
Register Biometric
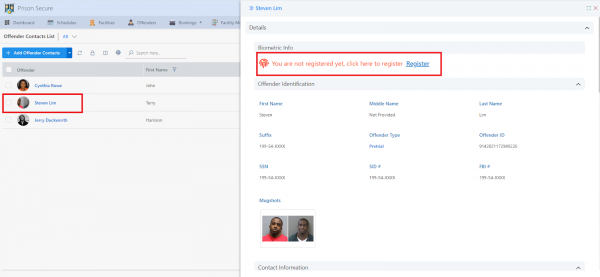
Since we are using a secure prison application from M2SYS eGov, we will need to register the biometrics of an offender. This can be done by clicking on the “Administrator” button located in the upper menu and selecting the “Offender Contact List.” From there, users can select the name of the offender they wish to register, and if the person is not yet registered with biometrics, they can click on the “Register” button.
This will trigger an API call to CloudScanr, which will initiate the biometric capture process. Once the biometric data is captured and is converted to a base64 template, it will initiate an API call to send the captured data to CloudABIS API, along with the necessary parameters. Based on the request received, the capture tool will then communicate the corresponding response back to the application.
 Identify Users
Utilizing biometrics, the administrator can identify individuals with precision by performing numerous 1:N searches. The identification process through the Prison secure app is simple. Click on the biometric icon from the offender contact list, and the app will initiate the biometric capture process by making an API call to the capture tool. The captured biometric data will be converted into a base64 template and sent to CloudABIS API through another API call. CloudABIS will search for the template in its stored database and return the results to the application.

We hope that the steps outlined above will assist you in implementing biometric functionality on your web platform. Should you encounter any issues during the configuration process or have any queries, please do not hesitate to contact us

